Attention
This documentation refers to the single-user TOAST-legacy version which is being phased out!
Consult https://docs.gempa.de/toast-client/current/ for the online documentation of the new TOAST multi-user version.
Installation
In this section we list requirements and instructions for the installation of TOAST. For the installation and configuration of SeisComP consult its documentation. Usually TOAST is installed and set up directly by gempa GmbH.
Note
gsm (gempa software manager) is a command line tool for handling software packages. Execute ./gsm -h to list options and consult the file README to get further information. After initial setup of gsm with ./gsm setup, the file gsm.conf contains the configured parameters. Re-run setup or edit gsm.conf with a text editor to make modifications. By default, bathymetry, forecast zones, source regions, map tiles etc. are installed at /home/data. Make sure you have write permission in the specified directories.
Install TOAST
Login as sysop (this is the user assumed throughout these instructions)
Download gsm and extract it:
sysop@host:~$ mkdir install
sysop@host:~$ cd install
sysop@host:~$ wget https://data.gempa.de/gsm/gempa-gsm.tar.gz
sysop@host:~$ tar -xf gempa-gsm.tar.gz
sysop@host:~$ cd gsm
sysop@host:~$ chmod u+x gsm
The initial gsm configuration is performed through the command setup which will auto-detect your operating system and ask for download credentials:
sysop@host:~$ cd $HOME/install/gsm
sysop@host:~$ ./gsm setup
Update the package list and install TOAST, EasyWave and other required or desired packages:
sysop@host:~$ cd $HOME/install/gsm
sysop@host:~$ ./gsm update
sysop@host:~$ ./gsm install toast easywave2 licenses seiscomp recordstream
Install dependencies
In order for TOAST to work, some library dependencies have to be met.
Login as root
Install dependencies
root@host:~# /home/sysop/seiscomp/bin/seiscomp install-deps base gui mysql-server toast
If you want to generate mp4 videos in the TOAST bulletins, you need to install MEncoder. For Ubuntu and Debian distributions, MEncoder is installed with the TOAST dependencies, but for RHEL it has to be installed separately:
root@host:~# /home/sysop/seiscomp/bin/seiscomp install-deps toast-mencoder
Enable GPU-based computation
Note
In contrast to previous versions of TOAST, in the current version the CUDA toolkit does not have to be installed, as the necessary libraries are included in EasyWave.
EasyWave can use either the CPU or the GPU for simulations, but on the latter it runs significantly faster. In order to take advantage of GPU computation, an NVIDIA graphics card supporting CUDA is required and the corresponding drivers have to be installed.
NVIDIA driver
In the following we list the procedure to install the NVIDIA drivers on RHEL 7 flavor distributions.
Login as root
Make sure you have the correct version of ELRepo installed:
root@host:~# yum remove nvidia-detect kmod-nvidia elrepo-release
root@host:~# rpm --import https://www.elrepo.org/RPM-GPG-KEY-elrepo.org
root@host:~# yum install https://www.elrepo.org/elrepo-release-7.0-4.el7.elrepo.noarch.rpm
Install NVIDIA drivers:
root@host:~# yum install kmod-nvidia nvidia-x11-drv
root@host:~# reboot
Directory/File structure
TOAST is usually installed within a SeisComP environment. The file/directory structure is:
Path |
Description |
|---|---|
seiscomp |
SeisComP root directory, referred to as $SEISCOMP_ROOT. Typically installed in $HOME or /opt/. |
$SEISCOMP_ROOT/lib |
Path to SeisComP and TOAST libraries |
$SEISCOMP_ROOT/bin |
Path to the TOAST executable |
$SEISCOMP_ROOT/share/toast/templates |
Path to the default templates directory which are used for Bulletin templates |
$SEISCOMP_ROOT/etc |
Configured TOAST parameters in toast.cfg |
~/.seiscomp |
User specific settings of SeisComP and TOAST |
~/.seiscomp/toast |
User specific settings of TOAST |
~/.seiscomp/toast/[plugins] |
Root directory for the TOAST plugins |
Setup
Environment variables
SeisComP and gempa modules require a set of system environment variables. Add them to ~/bashrc:
sysop@host:~$ ~/seiscomp/bin/seiscomp print env >> ~/.bashrc
sysop@host:~$ source ~/.bashrc
Secure database installation
By default, MariaDB is used as a replacement for MySQL. After installation it has to be started and secured:
sysop@host:~$ su
root@host:~# systemctl enable mariadb
root@host:~# mysql_secure_installation
Define a root password for the database and answer all other questions with Y.
Setup wizard
For a basic configuration of SeisComP and TOAST, including the respective databases, you can use: scconfig . If you prefer configuration via command line, type:
sysop@host:~$ seiscomp setup
Enter names for agencyID, datacenterID and
organization. Default values for the other parameters should be fine
in most cases.
Module configuration
Use scconfig to configure TOAST.
Note
Global parameters can be set either at
to set them for all SeisComP modules or at:
to set them only for TOAST.
TOAST specific parameters are set at:
.
Here we list some possible global parameter settings:
plugins = ${plugins},rsas,simeasywave2     # rsas is required if using CAPS
recordstream = caps://caps.acqui.de:18000  # set according to your waveform data source
database = mysql://localhost/seiscomp      # where TOAST loads inventory and bindings from
connection.server = proc                   # configure according to your SeisComP messaging system
connection.username = toast
And here are some TOAST parameter settings:
tsunami.database = mysql://sysop:sysop@localhost/toast    # database type and location
tsunami.database.loadLastDays = 1                         # load n last days upon startup
Note
If TOAST connects to a SeisComP messaging system using
connection.server, it will by default load inventory and database
from the database configured therein, which is usually set up for
seismic stations.
This is why above, database specifies the local SeisComP database
for loading the tide gauge Inventory and Bindings.
That in turn has not to be confounded with
tsunami.database which is the database where TOAST
stores incident and tsunami related data.
Inventory and Bindings
Via gsm you can install a package with preconfigured tide gauge inventory and bindings for the Global sea monitoring network of IOC.
Login as sysop
Install inventory and bindings:
sysop@host:~$ cd $HOME/install/gsm
sysop@host:~$ ./gsm install tidegauges-ioc
Update configuration and write to database:
sysop@host:~$ seiscomp update-config
For more information on how to configure bindings, consult the SeisComP documentation.
Hint
To use inventory and bindings from files instead from the database, start TOAST with:
sysop@host:~$ toast --inventory-db my_inv.xml --config-db my_conf.xml
Fault geometry configuration
If a tsunami on-the-fly-simulation using EasyWave is initiated and no focal mechanism (moment tensor) is available, then the strike-, dip-, and rake-angles and the depth for the automatic rupture patch generation are looked up in a file containing the information about subduction geometry and local faults (see: Flowchart for the automatic generation of simulations).
The parameter patches.maxFaultDist defines the maximum horizontal
distance allowed between epicenter and the closest point in the faults for
automatic patch generation and consequently for an automatic simulation to be
started. Default value is 1 degree.
Note
If you define your own faults file, make sure that the largest distance
between neighboring fault lines belonging to the same geologic feature is
not larger than twice the value of patches.maxFaultDist, otherwise
there might be a region between lines where no simulations are generated.
1 degree is fine for the default file.
Location
The file provided by gempa containing the fault definitions is:
$SEISCOMP_ROOT/share/toast/faults.xml.example.
This file has to be copied in order to be used and to make modifications
introduced by the user persistent throughout TOAST updates.
sysop@host:~$ cd $SEISCOMP_ROOT/share/toast
sysop@host:~$ cp faults.xml.example faults.xml
Content
TOAST is currently provided with a file (version 1.2) containing almost 200 fault lines covering most subduction zones world wide. For instance, it contains all contour lines from the slab2-model between 20 and 80 km depth. The lines at 0 km depth are either from the RUM-model (Gudmundsson & Sambridge, 1998), generated manually according to literature and bathymetry or from the previous version of the file (in which case reference is not set).
Structure
Below is an example for the structure of the file:
 1<gempa faults_version="1.2">
 2  <fault checked="true" depth="0.0" id="005" name="Algeria" reference="doi:10.1002/2014JB011751" type="reverse">
 3    <vertex dip="70" rake="90" strike="76">
 4      <latitude>37.590</latitude>
 5      <longitude>8.995</longitude>
 6    </vertex>
 7    <vertex dip="70" rake="90" strike="81">
 8      <latitude>37.389</latitude>
 9      <longitude>8.023</longitude>
10    </vertex>
11    ...
12  </fault>
13  ...
14  <fault checked="true" depth="20.0" id="021" name="Calabria 20 km #1" reference="Slab2" type="reverse">
15    <vertex dip="36" rake="90" strike="230">
16      <latitude>37.334</latitude>
17      <longitude>13.450</longitude>
18    </vertex>
19    ...
20  </fault>
21  ...
22</gempa>
The file contains several fault elements which have vertex sub-elements. Faults and vertices can be added, modified and removed manually via text editor. The format of the file is described below.
Line |
Description |
|---|---|
1 |
Version of the fault definitions. |
2 |
|
3 |
Vertex description including the attributes dip, rake, and strike. For definitions see for instance: openSHA. |
4 |
Latitude coordinate of the vertex. |
5 |
Longitude coordinate of the vertex. |
Forecast zones configuration
Forecast zones are geographical regions - oftentimes corresponding to political districts - for which a specific tsunami early warning bulletin is generated. Technically, the forecast zones are associated with forecast points for which simulation results are either computed on-the-fly or by extraction from a precalculated database.
See also: Forecast Zones perspective and: Forecast zones.
You can use gsm to install a set of predefined example forecast zones and points files:
sysop@host:~$ cd install/gsm
sysop@host:~$ ./gsm install forecastzones-rtsp
See Forecast zones and points file formats if you want to generate you own set of forecast zones and points files.
The forecast zones and profiles can be configured using scconfig.
Note
The forecast zones are configured at , while the forecast points are configured at plugin level, e.g. if used together with EasyWave.
First, add a forecastZones profile, configure the parameters and register the profile:
forecastZones.$name.filename- Without file ending! Points to a shape file (ending .shp), an index file (ending .shx) and an attribute file in dBase format (ending .dbf).forecastZones.$name.blacklist.country- Can be used if zones for a country are present in multiple forecast zones files.forecastZones- Registration of the profile(s).
Example:
forecastZones.rtsp.filename = /home/data/forecastzones/rtsp/6.0/cfz/CFZ_Version_6p0
forecastZones = rtsp
Then, add a forecastPoints profile, configure the parameters and register the points profile:
easywave2.forecastPoints.$name.filename- Points to a file in dBase (.dbf) format.easywave2.forecastPoints- Registration of the profile(s).
Example:
forecastPoints.rtsp.filename = /home/data/forecastzones/rtsp/6.0/cfp/CFP_Version_6p0.dbf
forecastPoints = rtsp
Forecast zones and points file formats
Note
Forecast zone and forecast point files are usually provided by the customer. They can be created using GIS software like QGIS. The extent of a forecast zone is related to local administrative districts, typically it is between 50 and 500 km. The number of points in a zone should be such that they cover the geographical area and geological features of the zone and can vary between a couple to a couple tens of points. Consult the example forecast files as a starting point. Consider that runup values for a zone are aggregated as described in Aggregation strategy. Make sure to check the points against the bathymetry used for simulations. See below the suggested naming scheme for the IDs of the zones and points.
Forecast zones
The forecast zones geographical outlines are defined in shapefiles (ending .shp). Attributes data are stored in dBase files (ending .dbf), and a third file (ending .shx) is used as index. The .dbf file may contain any attributes, following are used by TOAST:
Name |
Datatype |
Description |
Forecast Zones Perspective |
|---|---|---|---|
EX_BOX_ID |
Integer |
Unique forecast zone ID |
ID |
Place_NAME |
String |
Place name |
Place |
BOX_NAME |
String |
Forecast zone name |
Name |
COUNTRY |
String |
Country name |
Country |
CNTRY_CODE |
String |
Country abbreviation |
Geo code |
STATE_PROV |
String |
Province name |
Province |
The EX_BOX_ID (Exclusive Box Id) is mandatory and has to be unique (hence exclusive) as it is used as identifier for the forecast points (see below). All other parameters are optional, but the more information is provided the better.
Forecast points
For each forecast zone TOAST needs a set of forecast points. The points are stored in binary files in dBase format (ending .dbf). Following attributes in a forecast point file are used by TOAST:
Name |
Datatype |
Description |
Forecast Zones Perspective |
|---|---|---|---|
CFPNO |
String |
Unique forecast point ID |
ID (upon expanding) |
EX_BOX_ID |
Integer |
Link to forecast zone ID |
ID |
POINT_Y |
Double |
Latitude value |
Geo code |
POINT_X |
Double |
Longitude value |
Geo code |
Place_NAME |
String |
Place name |
Place |
COUNTRY |
String |
Country name |
Country |
STATE_PROV |
String |
Province name |
Province |
Place_NAME, COUNTRY and STATE_PROV are optional and are derived from the associated zone if they are not set.
Note
For the attributes EX_BOX_ID in the forecast zones and CFPNO in the forecast points we recommend a naming scheme using the country phone code. In this way, it is guaranteed that the IDs are unique throughout all zones and points. For instance, for Algeria having code +213 that would be: EX_BOX_ID: 2130001, 2130002, … CFPNO: 21300000001, 21300000002, …
Simulation bathymetry files configuration
In order for a tsunami on-the-fly-simulation to be computed (in contrast to a
pre-computed scenario), a directory containing the bathymetry file(s) for the
simulation backend has to be provided. In case of EasyWave, the directory is
configured at easywave2.data.
Example:
easywave2.data = /home/data/bathymetry/
You can use gsm to install a set of bathymetry files for EasyWave:
sysop@host:~$ cd install/gsm
sysop@host:~$ ./gsm install bathymetry
See Source regions configuration on how to configure the default bathymetry for the simulations within a source region.
Creating bathymetry files
TOAST is provided with bathymetries suiting the needs of the customer. Additional bathymetry files for EasyWave can be made by the following procedure:
Generate and download a bathymetry grid in geotiff format from NOAA Grid Extract:
Select ETOPO1 (bedrock)
Click on the icon Select area of interest by rectangle and use the mouse or enter the Area of Interest manually
Download Data
Convert the file to binary Surfer 6 grd format as used by EasyWave in two steps:
Use gdal software to convert the downloaded geotiff file to ArcGIS:
gdal_translate -of AAIGrid <geotiff_file.tiff> <ascii_file.asc>Use the script /home/sysop/seiscomp/share/toast/scripts/arc2grd.py to convert the ArcGIS file to binary surfer grid:
./arc2grd.py <ascii_file.asc> <surfer_file.grd>move the surfer file to the bathymetry directory
In case of EasyWave, the bathymetry has to be provided in Golden Software Surfer 6 binary (preferred) or text format.
Note
To display the bathymetry which was used for a simulation in map view with color coding, select a simulation and click Bathymetry in the Map Layers panel. Note that this works only for binary, not for text format grid files.
To show the outline of a bathymetry file as green line, go to the Simulation backend settings in the interactive simulation dialog and select the respective bathymetry (grid).
Source regions configuration
Source regions define polygon coordinates within which simulations should be started. See: Flowchart for the automatic generation of simulations.
Use gsm to install a set of predefined example source region files:
sysop@host:~$ cd install/gsm
sysop@host:~$ ./gsm install sourceregions
Using scconfig, add a sourceRegion profile and configure the parameters.
sourceRegion.$name.aoi- (Area Of Interest) points to a bna filesourceRegion.$name.name- Points to a bathymetry grd file (without file ending). This is the default bathymetry which is used for simulations within this source region. In the Simulation backend settings of the interactive simulation dialog it is highlighted with a star.
Register the profile at: sourceRegions.
Example
sourceRegion.IndianOcean.aoi = /home/data/sourceregions/IndianOcean.bna
sourceRegion.IndianOcean.name = io_rtsp
sourceRegions = IndianOcean
In the following figure, the sourceRegion defined in the profile above is shown as black line, and the outline of the default bathymetry associated with this sourceRegion is shown in green.
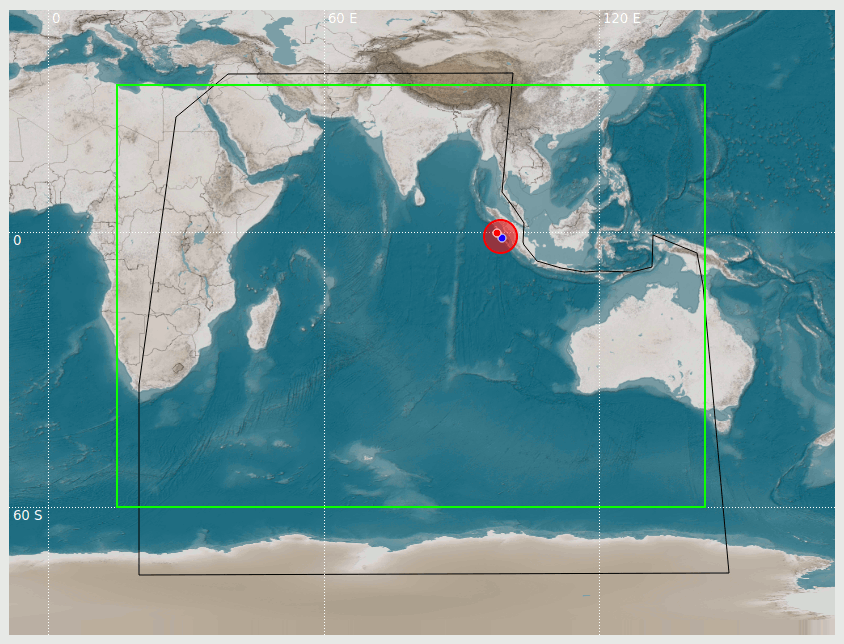
Source region (black line) and default bathymetry outline (green)
Note
To show source regions as black lines, copy their bna files to one of the two locations:
$SEISCOMP_ROOT/share/bna
~/.seiscomp/bna
bna polygons
Note
You can create bna polygons manually in the Map perspective. Click and hold the CTRL-key and do a series of left-mouse clicks. On the lower left you can see total length and area covered by the polygon. Then right-mouse click -> Measurements -> Save as BNA File.
Live tabs and templates configuration
See: Create warning bulletins and other output using templates on how to configure live tabs and templates for the generation and dissemination of tsunami warning bulletins.
Color profiles, gradients and colors configuration
The default color profiles, gradients and colors for the various features like maximum wave height, forecast zones or bathymetry are stored in the file /home/sysop/seiscomp/share/toast/mapstyles.default and the user-defined color profiles, gradients and colors in /home/sysop/seiscomp/share/toast/mapstyles, both defined in JSON format [1].
The color settings can be changed directly in TOAST using the color editor or color profile editor as described in Create and modify color profiles.
Note
If a gradient or color profile is not properly defined or present, the default gradient is used for the corresponding feature.
Warning
All changes made in /home/sysop/seiscomp/share/toast/mapstyles.default are overwritten with the next TOAST update.