Add real-time stations from GEOFON
You will use scconfig to:
Add stations of the GEOFON seismic network, obtained from GEOFON, as a source of data.
Configure bindings to see these in your local system.
Pre-requisites for this tutorial:
Afterwards/Results/Outcomes:
slinktool -Q locally shows GE streams are available
scrttv locally shows the GE station traces
Time range estimate:
10-15 minutes
Related tutorial(s):
Tutorial on Set up local waveform archiving
Tutorial on Enable local FDSNWS server
GEOFON operates a global broadband seismic network jointly with many partner institutions with focus on EuroMed and Indian Ocean regions. As of 2020, the network consists presently of 78 high-quality active stations, for which data is acquired in real-time. This network has been assigned the network code GE by the International Federation of Digital Seismograph Networks (FDSN).
The GEOFON data centre in Potsdam provides real-time data feeds for these stations. This tutorial demonstrates how to use this data in your own SeisComP system.
The steps involved are:
Download metadata for the stations of interest.
Import them into your SeisComP system, and create bindings.
View the stations and their traces in the SeisComP GUIs.
Check data are available
First, we’ll query the upstream Seedlink server, which runs on
host geofon.gfz-potsdam.de at port 18000.
We do this with SeisComP’s slinktool command, giving the -L option
to slinktool
$ slinktool -L geofon.gfz-potsdam.de
6C GF01  GF01
6C GF02  GF02
6C GF03  GF03
[..]
ZB URD20 URD20
ZB VAL41 VAL41
ZB VOS   VOS
This is a long list. It shows the network code and station code of each of the stations for which data is available from this Seedlink server. We’ll just be interested in a few stations, namely those corresponding to broadband 20 sps vertical channels - with channel code BHZ, and with network code GE
$ slinktool -Q geofon.gfz-potsdam.de | grep ^GE.*BHZ
GE ACRG     BHZ D 2019/11/28 06:51:48.7500  -  2019/11/28 09:18:32.1000
GE APE      BHZ D 2019/11/28 07:40:52.0400  -  2019/11/28 12:22:00.3950
GE ARPR     BHZ D 2019/11/27 23:23:27.4400  -  2019/11/28 09:41:22.1500
GE ARPR     BHZ E 2019/11/27 23:23:27.4400  -  2019/11/28 09:16:25.0400
[..]
GE KBS   00 BHZ D 2019/11/24 13:22:12.9695  -  2019/11/24 22:46:17.4195
GE KBS   10 BHZ D 2019/11/24 13:22:12.9695  -  2019/11/24 22:46:19.5945
GE KBU      BHZ D 2019/11/28 06:53:21.8450  -  2019/11/28 12:22:18.2450
[..]
The ‘-Q’ option provides a formatted stream list, with one line for each stream available from the server. The columns are described in Get real-time data from a remote Seedlink server (single station); the grep command here limits output to just those GE stations; without it, this server provides over 16000 lines of output.)
For an active station, with low latency, the last data time (on the right) will typically be just a few seconds in the past. If a station or its network connection to the GEOFON server is down, then it will be a longer time ago.
Download station metadata
There are several possible ways to obtain inventory.
Use WebDC3 [1] or network pages [2] to obtain metadata for existing seismic networks.
Other sources of inventory, like a dataless SEED file, can also be used.
The Gempa Station Management Portal, SMP [21], is another important source of station metadata. If you would like to create your own inventory you may use this online tool. Before doing so, you will need to create an account on SMP.
Option 1: Using FDSN web services
The FDSN web services [8] are the standard adopted by the FDSN and have been deployed at almost every data centre. One of them is called fdsnws-station and is the service to contact to get all information related to stations, sensors, responses, etc.
To get data from the fdsnws-station web service you can use any web client (browser or command line). For instance, the wget command. The file you will receive will be in StationXML format.
$ wget "http://geofon.gfz-potsdam.de/fdsnws/station/1/query?net=GE&level=response" -O ge.xml
Option 2: Using WebDC3
WebDC3 is a graphical interface which allows you not only to send requests to FDSN webservice servers, but also to explore available stations and query event catalogs from different data centres among other possibilities.
You can find detailed information about WebDC3 in the on-line documentation at WebDC3 [24].
Go to http://eida.gfz-potsdam.de/webdc3 with a browser.
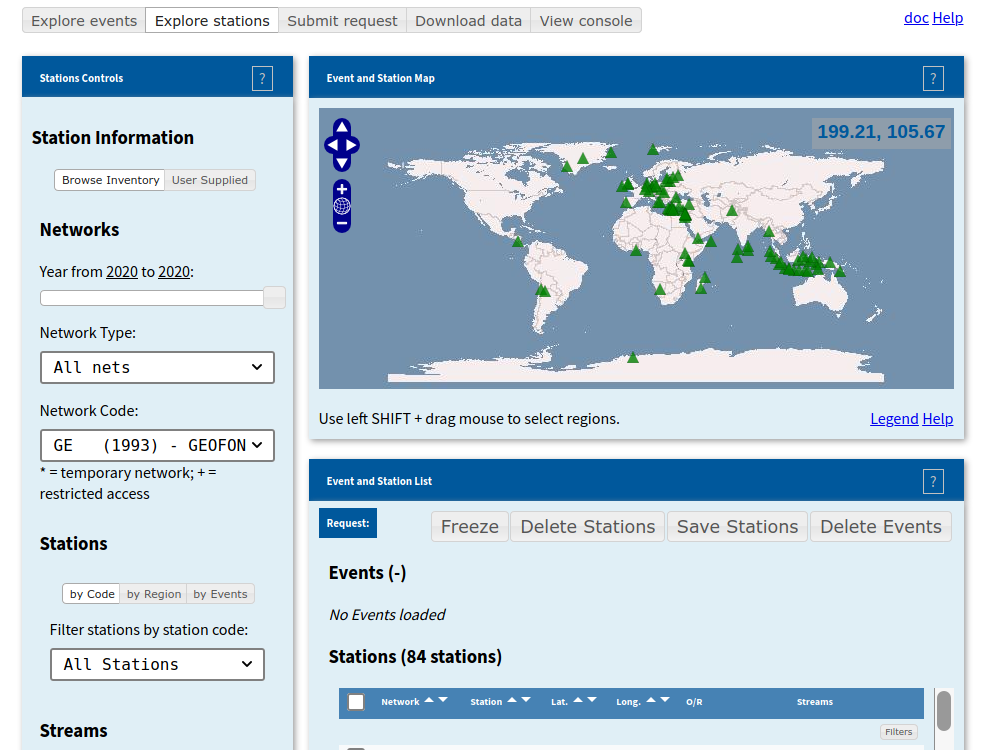
Click on “Explore stations” and move the slider to select only the current year and only “Public permanent nets” on the Network type list. Select the GE network, “All Stations”, BH channels, and click “Search”.
About 80 stations should appear on the map, and on the list below it.

Stations of the GE network shown in WebDC, ready for a metadata request.
Go to the third tab, named “Submit request”.
Click on “Absolute Mode” for the “Time Window Selection” and select time window from some time ago to the present.
In the “Request type” section, click on “Metadata (StationXML)”. Set “Metadata level” to “Response”. Response-level inventory is essential for SeisComP configuration.
For metadata requests, no token should be required. (This is only used for requests for restricted waveform data.)
If everything looks correctly click on “Submit”.
Go to the fourth tab, called “Download Data”.
In the “FDSNWS Requests” block, click on “Save” to mkae your request to the GEOFON fdsnws-station web service.
When it’s ready, you will be prompted to save an XML file to your local computer.
Now find where your web browser has saved the file.
Import the inventory
It is easiest to use the import function of the scconfig GUI. Alternatively, you can import from the command line:
From FDSN StationXML:
$ fdsnxml2inv -f station.xml > etc/inventory/mynetwork.xml
From SeisComP XML with filtering:
$ invextr -f --chans 'NE.STA.*' mynetwork.xml > etc/inventory/mynetwork.xml
Either way, afterwards, inventory is in ~/seiscomp/etc/inventory.
It now needs to be loaded in to the SeisComP database.
Import the metadata for your stations
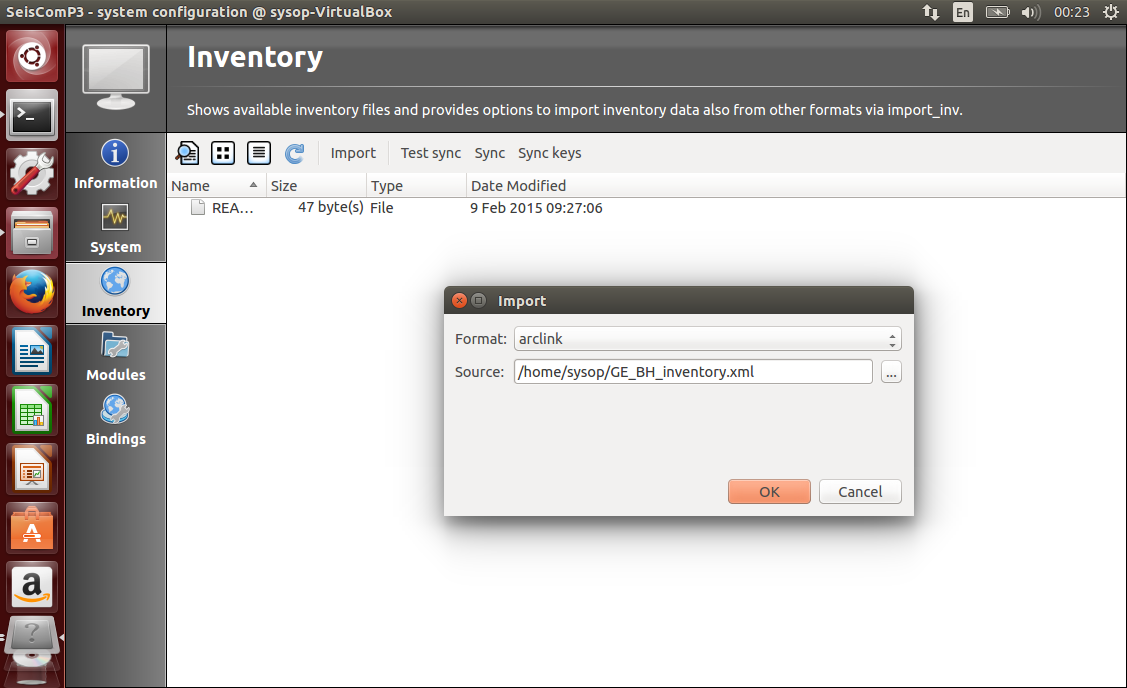
Open scconfig from the terminal. Click on the “Inventory” tab on the left side bar.
Select “Import” and at “Source:”, browse to the file with the inventory (e.g. ~/Downloads/inventory.xml). For “format”, select “fdsnxml”.

The Inventory tab of scconfig, during import of FDSN Station XML. TODO Update this figure.
Click on OK, wait a couple of seconds, check that the process was successful - it should display “Writing inventory to /home/sysop/seiscomp/etc/inventory/{PACKAGE NAME}.xml” and “Program exited normally” at the bottom. Close the modal window.
Sync or Sync keys. Make sure scmaster and Spread are running. SeisComP reads the inventory files in
~/seiscomp/etc/inventoryand loads them into the database. You will see messages like “Sending notifiers: 2%” as this occurs. Eventually you should see “Program exited normally” again.
Alternatively, go to “System” (second icon in the left column), click on “Update configuration” and restart SeisComP (Stop and Start buttons).
Configure bindings
As for individual stations (see the processing tutoriual), we will need to create bindings for every GE station to the “global”, “scautopick” and “seedlink” applications, as follows:
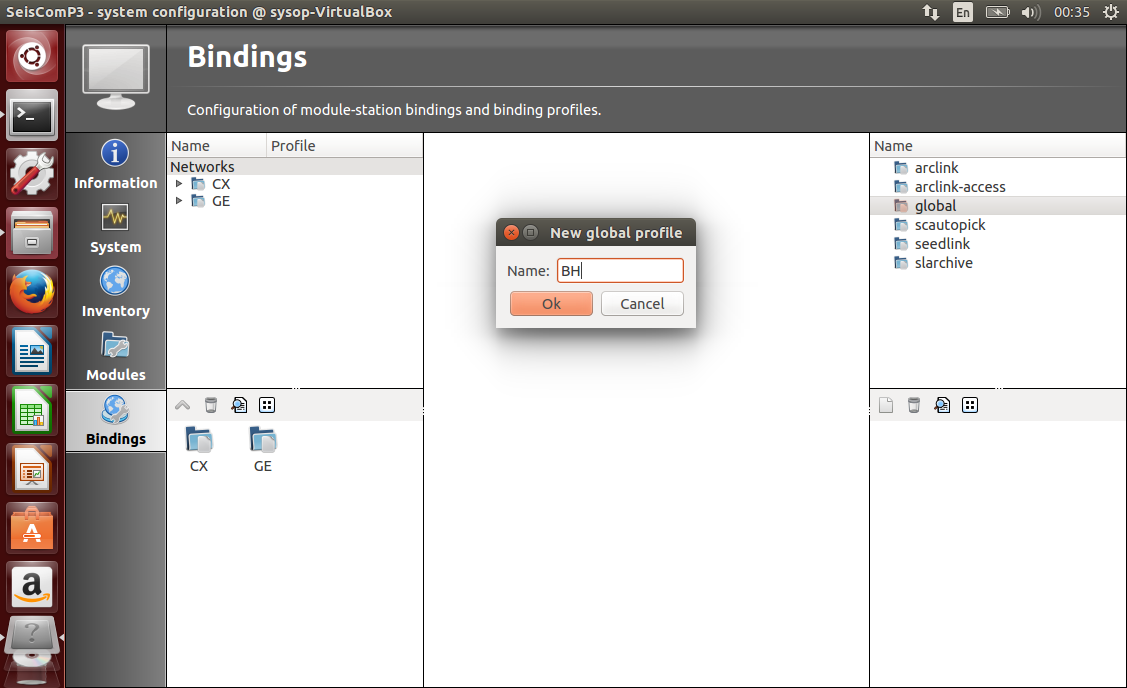
Create a global profile named “BH” by clicking with the right button on “global” in the top right panel. Double click on it and set BH as detectStream and empty location code as detecLocID information.

The “Bindings” tab in scconfig. A profile for global, called “BH” is being created.
TODO CX stations are visible too.
Create a scautopick profile named “default” (no changes necessary).
Create a seedlink profile named “geofon”. Double click on the profile. Add a chain source with the green plus button on the left (no other changes are necessary for data from GEOFON’s server, as it is the default).
Drag and drop all profiles from the right side to the network icon on the left side (you may do that also at the station level).
Press Ctrl+S to save the configuration. This writes configuration files in
~/seiscomp/etc/key.
Note
A few GEOFON stations (including KBS, LVC, SUMG) are distributed
with a non-blank location code, typically either “00” or “10”.
Configuring these requires additional work.
You can create a profile setting detecLocID to “10”,
called “10BHZ”, and apply this to the appropriate stations.
Repeat this for stations where location code “00” is desired (e.g. SFJD).
Update the configuration
The SeisComP database must be updated with the inventory and bindings. SeisComP’s modules then require restarting to load the updated information.
Go to the System tab and press ESC (the Escape key, to de-select all modules).
Click on “Update configuration”, at the right of the window. (Not “Update”, - that just refreshes scconfig’s display of what is running!)
Press Start to start acquiring data from the already configured stations.
Alternatively, on the command line
$ seiscomp update-config
$ seiscomp restart
Check it works
To confirm that you have waveform data for the station locally, run slinktool.
$ slinktool -Q
Open scmv to see a map view of the configured stations.
Open scrttv to see the incoming real-time streams.
If you see colored triangles and traces incoming it means that you have configured your system properly. With this last step the configuration of these stations is considered to be finished.
Further steps
At this point, you can follow the same procedure for other networks/stations, provided you
Have metadata available.
Know the location of a Seedlink server for, and have access to, the waveforms.