Templates
Templates are the backbone of RGSM, they allow to create user-defined reports. The latex templates make use of Jinja2 which integrates Python into latex, therefore the templates can recognize Python variables. Contact gempa for assistance if needed.
Adding a new template
To add a new template, either copy, rename and modify one of the provided
templates or create your own templates and move them into the directory
$SEISCOMP_ROOT/share/[shard|sigma]/templates/. Those are the recommended
directories to store the templates. The advantage of those directories is that
only the template filenames need to be provided instead of the full path, e.g.:
templateFiles = template1.tex, template2.tex
Nonetheless, RGSM can also use templates outside of the default template locations, therefore the correct path of the template files must be given (the path may contain seiscomp path variables, as @DATADIR@), e.g.:
templateFiles = @DATADIR@/templates/template1.tex, /home/sysop/templates/template2.tex
Note
Be aware that any changes to the provided templates will be overwritten once RGSM is updated.
Note
Either use only ' (single quotes) or " (double quotes) in the entire latex template to avoid Python parsing errors by Jinja.
Usage of variables in templates
There are specific variables that can be used in the latex templates. They offer the chance to use post-processed results in the report. The list differs between SHARD and SIGMA/AUTOSIGMA. To use variables, put the variable name inside of double curly brackets, e.g. {{ magnitude }}.
Use option --print-vars to get the list of usable variables for your current incident and template. This list might differ, depending on the used template, used module and available content in the report directory.
For an exemplary SHARD incident, the variable smParameters and sub-variables can be utilized in a template:
\begin{table}[h]
    \begin{tabular}{|l|l|l|l|l|l|l|l|l|l|l|}
        \hline
        Net & Sta  & Loc & Cha & max PGA  & max PGV  & max PGD  & max EDA & max CAV & max T & max Tp\\
        & & & & [m/s\textsuperscript{2}] & [m/s] & [m] & [m/s\textsuperscript{2}]  & [m/s] & [s] & [s]\\
        \hline
        {% for key, value in smParameters.items() %}
            {{ value.networkCode }} & {{ value.stationCode }} & {{ value.locationCode }} & {{ value.channelCode }} & {{ value.valuePGA_max }} & {{ value.valuePGV_max }} & {{ value.valuePGD_max }} & {{ value.EDA_max }} & {{ value.CAV_max }} & {{ value.duration_max }} & {{ value.Tp_max }}\\ \hline
        {% endfor %}
    \end{tabular}
\end{table}

Figure 39: Exemplary result of the latex code above
It is possible to show acceleration parameters in units of ‘g’. Further, for SHARD the table can be expanded to include the threshold of the configurable pgaAlert, pgaWarning and pgaWatch (as each sensor can have its own thresholds, the minimum and maximum per nslc is formed).
\begin{table}[h]
    \begin{tabular}{|l|l|l|l|l|l|l|l|l|l|l|l|}
        \hline
        Net & Sta  & Loc & Cha & max PGA  & max PGV  & max PGD  & max EDA & max CAV & max T & max Tp & pgaAlert \\
        & & & & [g] & [m/s] & [m] & [g]  & [m/s] & [s] & [s] & threshold [g]\\
        \hline
        {% for key, value in smParameters.items() %}
            {{ value.networkCode }} & {{ value.stationCode }} & {{ value.locationCode }} & {{ value.channelCode }} & {{ value.valuePGA_g_max }} & {{ value.valuePGV_max }} & {{ value.valuePGD_max }} & {{ value.EDA_g_max }} & {{ value.CAV_max }} & {{ value.duration_max }} & {{ value.Tp_max }} & {{ structure.nslc[value.waveformID].pgaAlert_g_min }} \\ \hline
        {% endfor %}
    \end{tabular}
\end{table}

Figure 40: Exemplary result of the latex code above
Times and time zones
The variable {{ originTime }}, and derivatives, refer to the origin time directly found in the incident.xml and therefore is assumed to be given in UTC. However, the variable {{ originTimeLocal }}, and derivatives, refer to the time zone of the machine the report is created on. Usually this is also UTC.
To convert a time to a specific time zone, use convertToTimezone (a custom jinja2 filter). The initial input has to be string or an internal variable containing a time, e.g. {{ originTime }}. Time zone strings have to be supported by dateutil.tz.
Exemplary timezone values:
“Europe/Berlin”
“Asia/Dubai”
“UTC+10”
“CET”
The jinja filter supports specifying the output format using the argument form. For example, showing only the date or time, rearranging the time values and/or changing the separators in-between. Visit datetime docs for a detailed description and possibilities of how to modify the time string. A special value is “code” (similar to form=”%z” or “%Z”), this will return the code of the time zone, either relative to UTC or a known time zone name.
Exemplary usage of the filter convertToTimezone:
{{ originTime }}
% 2019-07-06T03:19:53.0000Z

{{ originTime | convertToTimezone("Asia/Dubai") }}
% 2019-07-06 07:19:53

{{ originTime | convertToTimezone("Asia/Dubai", form="%Y/%m/%d") }}
% 2019/07/06

{{ originTime | convertToTimezone("Asia/Dubai", form="%H.%M.%S") }}
% 07.19.53

{{ originTime | convertToTimezone("Asia/Dubai", form="code") }}
% +04
Alert level
The variable {{alertLevel}} for SHARD is calculated based on the highest exceeded PGA-level of any sensor.
The variable {{alertLevel}} for SIGMA/AUTOSIGMA is calculated based on the highest MMI found for any given Point Of Interest (POI).
Display plots
RGSM can create waveform, reference- and spectrum plots based on the files the modules, i.e. SHARD and SIGMA/AUTOSIGMA, provide. For that, the templates have to contain the path to the files-to-create. Only if these specific path names are found in the template, the corresponding plots will be created and displayed in the report. This procedure reduces the creation time of reports in cases certain plots are unwanted. Per default, the content of the plots is displayed in English. To translate or rephrase it there is the option to use a translation file (see Plot Translations).
Waveform + Spectrum
To enable plotting the waveform + spectrum, the template needs to include
[Unit]-1C-wav+spec, whereas unit is one of acc, vel or disp. Only
the corresponding units will be plotted. E.g. if only acc-1C-wav+spec is found
the acceleration traces are plotted, if acc-1C-wav+spec and
disp-1C-wav+spec both are plotted.
Exemplary:
\section{Waveforms and Fourier spectra of station with peak values}
{% for key, value in smParameters.items() %}
    {% for component in value.components %}
        \begin{figure}[th]
            \centering
            \includegraphics[width=0.9\textwidth]{ {{inputPath}}/{{value.waveformIDmod}}{{component}}{{value.unit}}-acc-1C-wav+spec.pdf }
        \end{figure}
    {% endfor %}
{% endfor %}

Figure 41: Waveform + spectrum plot of one station
Response Spectrum
Similar, to enable plotting the response spectra the template needs to include
-resp.pdf.
Exemplary:
{% for key, value in smParameters.items() %}
    \begin{figure}[th]
        \centering
        \includegraphics[width=0.9\textwidth]{ {{inputPath}}/{{value.waveformIDmod}}-resp.pdf }
    \end{figure}
{% endfor %}
In addition to the response spectrum, the design spectrum can be visualized as
well. RGSM checks the directory @DATADIR@/stations/design if a
corresponding design spectrum for a displayed stations exists. As SHARD and
SIGMA/AUTOSIGMA use the same directory, usually station-specific design spectra should
exist already.
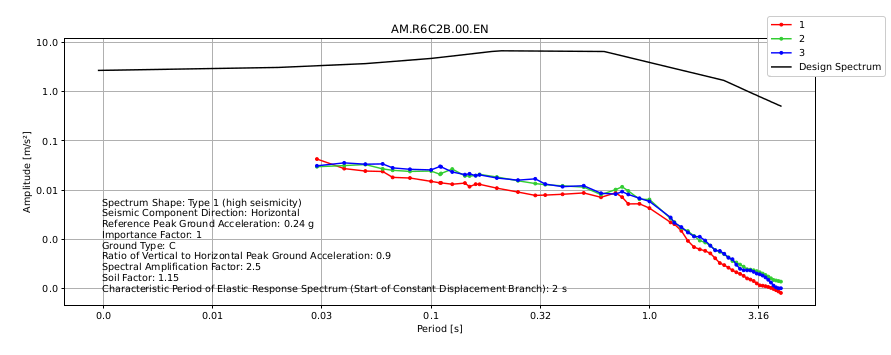
Figure 42: Response and design spectrum of one station
Fragility curve
If the template includes fragility-curve.pdf, a fragility curve per station
with its maximum measured ground motion value can be plotted.
Exemplary:
\section{Fragility curve}
    {% for key, value in smParameters.items() %}
        \begin{figure}[th]
          \centering
          \includegraphics[width=0.85\textwidth]{ {{inputPath}}/{{value.waveformIDmod}}-fragility-curve.pdf }
        \end{figure}
    {% endfor %}
RGSM checks the directory @DATADIR@/stations/fragility if a
corresponding fragility curve for each station exists. As SHARD and SIGMA/AUTOSIGMA
use the same directory, usually station-specific fragility curve should exist
already. RGSM currently supports the fragility curve OpenQuake NRML format
versions 0.4 and 0.5 (see SHARD documentation).
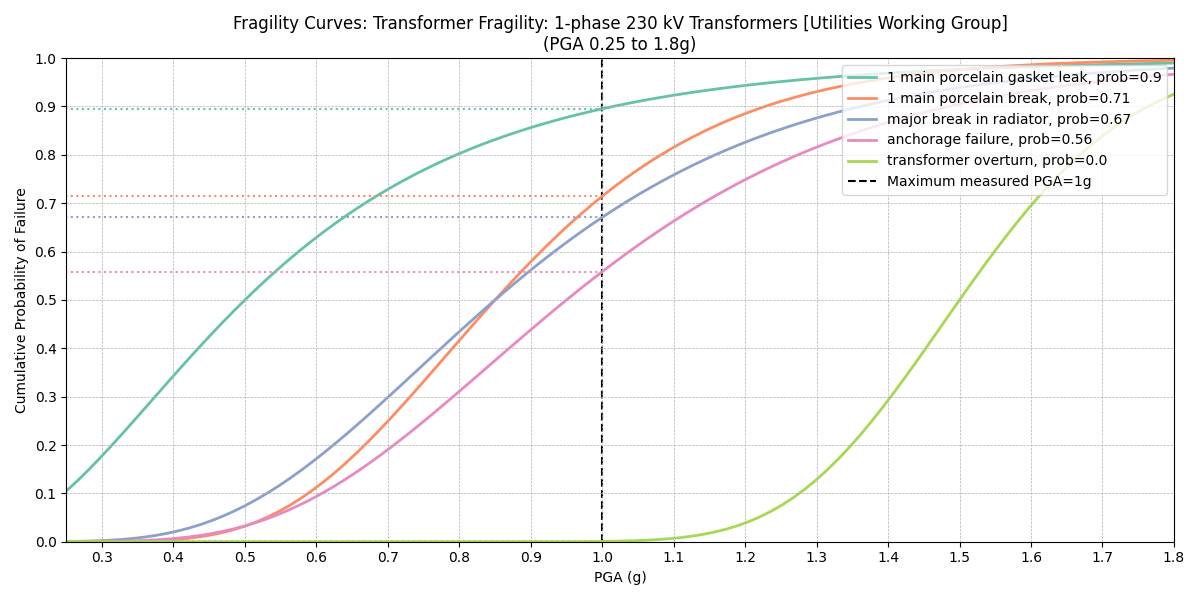
Figure 43: Exemplary fragility curve for PGA of 1g for a transformer.
Special functions in templates
There are some special and useful functions that can be used in the templates.
Translations (trans)
The variable content is in English. Hence, latex templates can include custom translations, using the trans function by providing a list of key values pairs. Hereby, the keys are the values of Python variables (see Usage of variables in templates).
The syntax is one line per word/phrase:
{# trans: "English word/phrase" = "translation" #}
List of text-keys that can be translated, might not be complete
{# trans: "Not felt" = "..." #}
{# trans: "None" = "..." #}
{# trans: "Weak" = "..." #}
{# trans: "Very light" = "..." #}
{# trans: "Light" = "..." #}
{# trans: "Slight" = "..." #}
{# trans: "Moderate" = "..." #}
{# trans: "Strong" = "..." #}
{# trans: "Very strong" = "..." #}
{# trans: "Severe" = "..." #}
{# trans: "Violent" = "..." #}
{# trans: "Extreme" = "..." #}
{# trans: "Moderate/Heavy" = "..." #}
{# trans: "Heavy" = "..." #}
{# trans: "Very heavy" = "..." #}
{# trans: "\textcolor{red}{ALERT ON}" = "\textcolor{red}{...}" #}
{# trans: "\textcolor{green}{NO ALERT}" = "\textcolor{green}{...}" #}
{# trans: "N" = "..." #}
{# trans: "E" = "..." #}
{# trans: "S" = "..." #}
{# trans: "W" = "..." #}
Plot Translations
The default content of the generated plots is in English.
To translate or even rephrase titles, axes and/or labels of plots that are
created by RGSM a translation file can be defined.
This file needs to be stored in the template directory of the specific module,
seiscomp/share/rgsm/[shard|sigma]/templates.
Further, to use a custom translation file, it must be specified in the used
template itself. Hereby the keyword has to be {# plotTranslationFile: … #},
filled by the translation file, i.e.:
{# plotTranslationFile: plot_translations_custom.json #}
The translation file needs to be in JSON format. The key-values pairs are stored under the main key “PLOT_TRANSLATIONS”. Whereas the keys correspond to specific segments of the plot. The values contain the text, which can be modified as desired. Only the key-value pairs that should be modified need to exist in the file, the rest is taken from the default file. Additionally, some keys support special ‘variables’ in the values that are only usable for the corresponding key, e.g., FRAGILITY_LABEL_X with {imt} and {unit} or SEISMIC_TITLE with {waveformID} and {startTime}. Those are the variable names within the Python code. However, all keys can make use of the more general template variables (see Usage of variables in templates).
The default file contains all (currently) available keys:
{
    "PLOT_TRANSLATIONS": {
        "SEISMIC_TITLE": "Timeseries and spectrum for {waveformID} @ {startTime}",
        "SEISMIC_LABEL_X": "Time (s)",
        "SEISMIC_LABEL_Y": "Amplitude ({unit})",
        "SEISMIC_LABEL_AMPLITUDE": "Amplitude",
        "SEISMIC_LABEL_DURATION1": "Duration Ia05 to Ia95",
        "SEISMIC_LABEL_DURATION2": "Duration Ia25 to Ia75",
        "FREQUENCY_LABEL_X": "Frequency (Hz)",
        "FREQUENCY_LABEL_Y": "dB",
        "FREQUENCY_LABEL_SIGNAL": "Signal Spectrum",
        "FREQUENCY_LABEL_NOISE": "Noise Spectrum",
        "RESPONSE_TITLE": "Response spectra for {waveformID}",
        "RESPONSE_LABEL_X": "Periods (s)",
        "RESPONSE_LABEL_Y": "Amplitude (M/S**2)",
        "RESPONSE_LABEL_DESIGN": "Design Spectrum",
        "FRAGILITY_TITLE": "Fragility curve for {waveformID} \n {fragCurveDescription}",
        "FRAGILITY_LABEL_X": "{imt} ({unit})",
        "FRAGILITY_LABEL_Y": "Cumulative Probability of Failure (%)",
        "FRAGILITY_LABEL_LINE": "Maximum measured {imt}={fragilityMaxValue}{unit}",
        "DISTPLOT_TITLE": "Origin time: {originTime}\n Amplitude in {unit}",
        "DISTPLOT_LABEL_X": "Time since Origin time (s)",
        "DISTPLOT_LABEL_Y": "Distance (km)"
    }
}
To use quotation marks (”) in the text, use escape characters, e.g., \”.
Translation of Flinn-Engdahl Regions
Additionally, the Flinn-Engdahl regions can be translated.
One way is to translate each region manually as described in Translations (trans),
or, which might be more convenient as is does not need to be defined in every
template, by putting a file named translation.map in the corresponding
directory seiscomp/share/rgsm/[shard|sigma].
This file needs to have the following syntax:
...

[Regions]
FE1=FE1_translation
FE2=FE2_translation
...
Point Of Interest (POI)
Only used by SIGMA/AUTOSIGMA
SIGMA/AUTOSIGMA generates a MMI grid based on the applied GMPE. In the template multiple point of interest (POI) can be defined, e.g., cities or structures. For these POIs the MMI is extracted and can be displayed in the report.
The syntax is one line per POI:
{# poi: NAME, LON, LAT #}
Exemplary, the following code uses the POIs to create a table:
\begin{tabular}{|l|c|c|c|c|}
    \hline
    \multicolumn{5}{|c|}{\textcolor{red}{Intensity at Main Cities}}\\
    \hline
    \textbf{City} & \textbf{Distance (km)} & \textbf{Intensity (MMI)} & \textbf{Perceived Shaking} & \textbf{Potential Effect/Damage} \\
    \hline
    {% for key, value in POI.items() %}
        {% if key != "epicentre" %}
            \hline
            {{value.name}} & {{value.repi}} & {{value.intensity_roman}} & {{value.shaking}} & {{value.damage}} \\
        {% endif %}
    {% endfor %}
    \hline
\end{tabular}
gempa Image Server (GIS) image integration
It is possible to create additional map images by using the gempa Image Server (GIS).
In order to use GIS, provide its URL address plus query parameters. There are specific placeholders for the query that might be used to customize the map, i.e. the event location (#EVLAT#, #EVLON#), depth (#EVDEPTH) and magnitude (#MAG#). An example can be seen below. Multiple URLs can be declared and used as an internal variable (gislink_{NAME}), whereas NAME needs to be given with the URL. The output format has to be png.
The syntax is one Name-URL per line, with the importance of using “:
{# gis: "NAME" = "URL" #}
Exemplary, the following code defines GIS urls and uses them via the internal variables.
{# gis: "smallmap" = "http://localhost:20001/map?reg=#EVLAT#,#EVLON#,1,1&dim=512,256&origin=#EVLAT#,#EVLON#,#EVDEPTH#&mag=#MAG#" #}
{# gis: "bigmap" = "http://localhost:20001/map?reg=#EVLAT#,#EVLON#,15,15&dim=512,256&origin=#EVLAT#,#EVLON#,#EVDEPTH#&mag=#MAG#" #}
\includegraphics[width=0.8\textwidth]{ {{gislink_smallmap}} }
\includegraphics[width=0.8\textwidth]{ {{gislink_bigmap}} }
Media
The directory $SEISCOMP_ROOT/share/[shard|sigma]/media/ contains
pictures that RGSM can use. Although, latex templates are able to use
absolute paths to any directory or file, we suggest to put all static pictures
related to the report, e.g., agency logo, in this directory. Additionally, some
latex variables won’t work if the files in this directory are not correctly
defined.
E.g., the latex variable {{agencylink}} corresponds to the file name $SEISCOMP_ROOT/share/[shard|sigma]/media/agency.png. If it does not exists, the file agency_default.png is used instead.